Guerrilla Gardening

This summer, my hobby has been cleaning and beautifying my small corner of Astoria.

It all began with a mourning dove nest under my AC.

A cat looking out the window at a mourning dove nest tucked under an AC unit

Dove nest, bird mites

The doves had a couple rounds of babies a few weeks apart. After they abandoned it, a bunch of bird mites invaded my AC. It was creepy, but they don't feed on humans or cats, so we were safe.

I got rid of the abandoned nest, which made a mess of twigs in my apartment courtyard. A week passed, and the twigs were still there on the side of the footpath.

I created the mess, so I needed to clean it up. I bought a broom and dustpan, and swept it up.

It was satisfying. I was hooked.

Courtyard, sidewalk, tree beds

Litter would build up by the two entrances to my courtyard. Plastic of all sorts, vapes, bags. So I swept them up.

My cleaning then expanded to the sidewalk in front of the apartment building. Lord knows how long some of that litter had been sitting there.

I also started doing little litter patrols in the neighborhood.
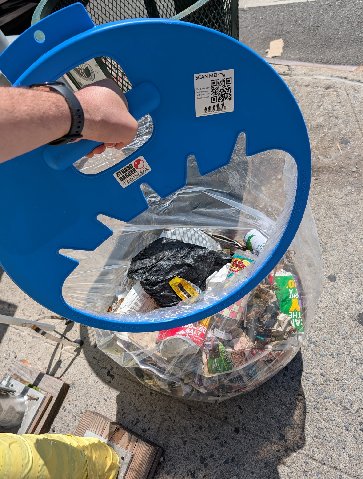
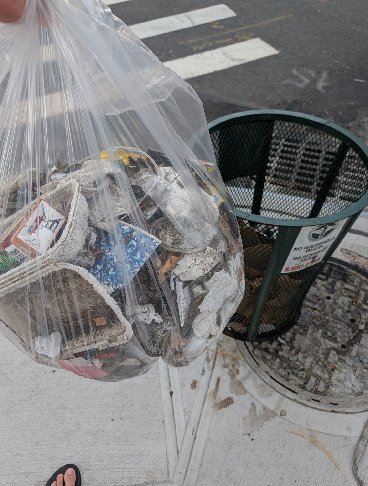
An overflowing public trash can on the sidewalk, full of litter A trash can next to another full public bin during a litter patrol A bag stuffed full of collected litter next to a public trash can

I started cleaning the tree beds in front of the building. I've learned that untended tree beds become de facto trash cans. Lots of small plastic containers, bottle caps, glass. So I swept it all up.

A bare, patchy tree bed on the sidewalk before any cleanup

There are only the city-planted trees and dirty dirt in those tree beds, but they deserve to be cared for.

Make it pretty, with bricks

After a few weeks of this cleaning, it occurred to me that the tree beds were a form of public space. Public gardens that often weren't tended to.

So I thought, why not make them prettier? Have them spark a little joy.

I took a walk around the neighborhood for some inspiration, looked at a few different nice tree bed setups, and decided: a nice simple red brick border. If it didn't go higher than 2 inches, then I wouldn't even need a permit to do so. Perfect.

Went to Home Depot, bought 45 bricks, and one Saturday afternoon of hard work later, we had a pretty red brick border on the two tree beds framing my apartment courtyard entrance.
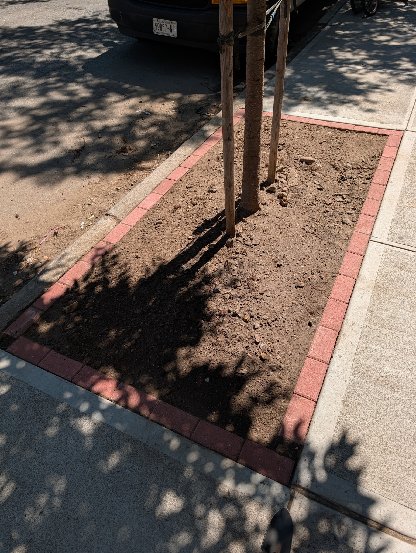
A tree bed freshly bordered with red bricks, freshly turned dirt inside

Make it pretty, with dirt

The tree beds weren't in their final form yet, though. They still needed green plants. Pretty flowers.

But first, the dirt needed some love.

So after a bunch of unfruitful trips to Home Depot and Big Reuse, I secured some organic compost. From Home Depot, it turns out. The trick was to order pickup so they'd fetch it from ✨the back✨.

4 bags of organic compost per tree bed. I used my new cultivator, and mixed the compost into the tree beds. It's amazing how even just fresh, rich dirt alone made the tree beds look better. Healthier.
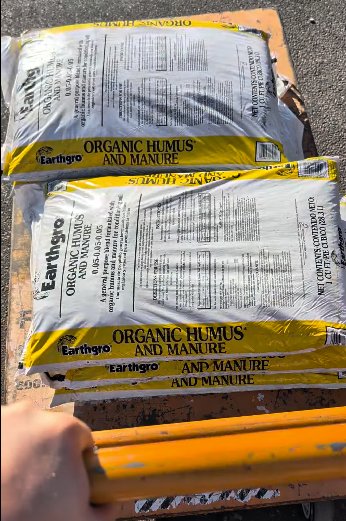
Bags of organic humus and manure compost loaded on a cart

Make it pretty, with flowers

Litter, cleaned regularly. Bricks, laid. Organic compost, all set.

This left one thing: pretty flowers.

I rented a Toyota 4Runner through Zipcar and made another visit to Home Depot.

Bought twelve lilyturf, four orange aster, four light purple aster. To be split between the two tree beds.
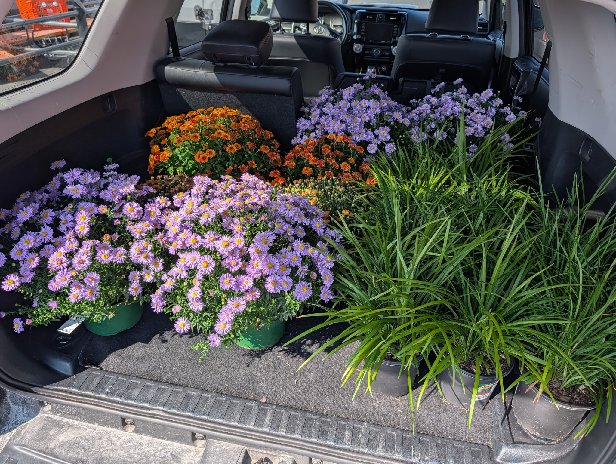
The trunk of a rented SUV packed with potted purple and orange flowers and lilyturf

After another Saturday afternoon of manual labor, with the help of my friend David, the plants were planted.
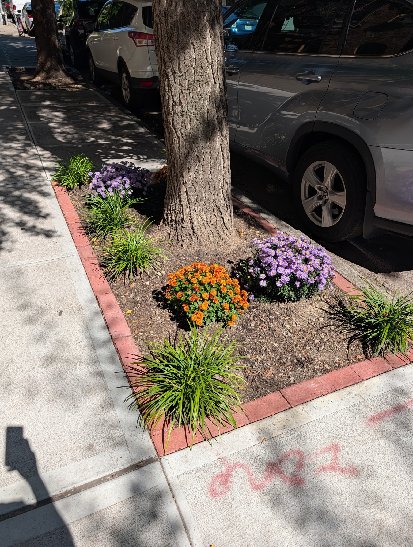

A finished tree bed with a brick border, orange and purple flowers, and lilyturf planted around the tree A wider view of the finished, planted tree bed from above

Why

We deserve beautiful spaces, joyful streets. These tree beds are public gardens waiting to be tended to.

When we live in a city like New York, we leave the neighborhood's upkeep to the city. "That's what our taxes are for, right? Street cleaning and parks?"

But that's a lot to ask. There's too much street and soil for the city to watch over, and it can't take care of a block the way the people who live there can.

If we're willing to accept that responsibility, we can have nice things: beautiful gardens, clean streets, and third places for people to gather.

I'm really happy with how the tree beds turned out, and I'm glad to report that neighbors have told me they're happy with them too.

One guy told me: "They're beautiful, I've never seen anything like that in front of the building in the 30 years I've been here." I really thought that was beautiful.

A few days later, another neighbor told me they came out very pretty, and that she hasn't seen anything like that in front of the building in the 50 (!!) years that she's been here. Now that's wild.

We're really out here changing the city.

localmart: why, what, and a visualization

why & what

For the first couple months of the year, I was working on an idea called localmart.

The motivation behind of localmart is this:

  1. Lots of people today order things from Amazon that they could get in their neighborhood.
  2. That means that money is being extracted from local neighborhoods into global corporations.
  3. So what if we were able to provide the Amazon.com experience, but all the goods are sourced from local stores so that your money gets reinvested into your neighborhood?

So in short, localmart is a service where you order local goods from local stores, and it gets delivered within a day or two.

visualization

I've had a visualization in mind to explain localmart to folks, so here's a quick version.

Cash is flowing out to corporations, but with more local orders, cash stays in the neighborhood and makes the neighborhood healthier.

Orders in Astoria
June 2025
To corporations:
$0
To neighborhood:
$0
0%

Working with Electron

Working with Electron is a pleasure. I just built an app called Redub with it. For the uninitiated, here is how the creators describe Electron:

Electron is a framework for creating native applications with web technologies like JavaScript, HTML, and CSS.

Most programmers know how to build web apps. Now, with that same knowledge, you can build cross-platform desktop apps.

Electron gets a lot of crap for being too resource intensive and for enabling lazy developers. The haters say that better frameworks for desktop apps already exist and that you should use those instead.

They're right, Electron apps are more intensive than I'd like. For those unaware, it's because every app has a full browser baked into it. That's how you're able to use Javascript, HTML, and CSS.

But let me be the first to say: the haters are missing the point, as usual. The real value of Electron is that it lets you move from random idea to cross-platform app fast, using the web dev knowledge you probably already have (which also means you have a huge community to draw from).

Also, it's not like you the performance problems can't be addressed. Solutions are already being proposed. For example, there's talks of an "Electron runtime". Basically, every Electron app on your system would share a single copy of chromium.

Finally, let's be real. Most people don't have the time to learn a new language and cross-platform framework. So if there wasn't a way to use web tech to build desktop apps, some ideas wouldn't ever get created.

So, I ask you, dear reader: would you rather live in a world with apps that are memory hogs but fulfill unique needs, or not have those apps exist at all? I'm definitely with the first.

Insert an audio clip to a video file with FFMPEG

The goal

For a hobby project of mine, I wanted to be able to merge an audio clip into the existing audio track of a video file.

The command

After struggling for an hour or two, I finally came up with the correct incantation of the command ffmpeg to overlay an audio clip to a video file:

ffmpeg \
  -i movie.mkv \
  -i new-audio-clip.mp3 \
  -filter_complex "[1:0] adelay=2728000|2728000 [delayed];[0:1][delayed] amix=inputs=2" \
  -map 0:0 \
  -c:a aac -strict -2 \
  -c:v copy \
  output.mp4

The explanation

Line by line:

  • -i movie.mkv: set the video/audio file as an input
  • -i new-audio-clip.mp3: set the audio clip as an input
  • -filter_complex "...": specify the two following filters:
    • "[1:0] adelay=2728000|2728000 [delayed]: the adelay filter, specifically:
      • [1:0]: using the second input file's first stream
      • adelay=2728000|2728000: add a delay of 2,728,000 milliseconds to both channels of the audio (the left and right channels, because the audio is stereo)
      • [delayed]: assign the name "delayed" to the new stream
    • [0:1][delayed] amix=inputs=2: the amix filter, specifically:
      • [0:1][delayed]: using the first input's second stream and the "delayed" stream
      • amix=inputs=2: mix the two audio streams (NOTE: I'm not 100% on the meaning of inputs=2 here)
  • -map 0:0: add the first input's first stream to the output (which is the video)
  • -c:a aac -strict -2: use AAC for audio encoding
  • -c:v copy: don't re-encode the video (in other words, copy the original encoding)
  • output.mp4: specify the output file

JS version

And for any of you interested in doing this in JavaScript, here's the same command translated to node-fluent-ffmpeg:

ffmpeg()
  .input('movie.mkv')
  .input('new-audio-clip.mp3')
  .complexFilter([
    '[1:0] adelay=2728000|2728000 [delayed]',
    '[0:1][delayed] amix=inputs=2',
  ])
  .outputOption('-map 0:0')
  .audioCodec('aac')
  .videoCodec('copy')
  .save('output.mp4')

Realization

After writing all of this, I now realize that I actually need to silence the video's audio track for the duration of the new audio clip. Not merge them.

Back to work.

A React Native library to run commands over SSH

For my React Native app Hooks, I wrote some native Android code to enable the running of arbitrary commands over SSH.

I've now added the iOS side, and after some refactoring, the SSH code for both platforms is now its own library: react-native-ssh.

There are no tests and it's very light on the error handling. But I figured I'd put it out there for others to use and/or improve upon.

Native dependency pains

Gradle (the Android build system) lets you specify dependencies from Maven (Java's package repository). This meant that including the Android SSH library I needed was a single line. Nice and easy.

Installing third-party dependencies on the iOS side of things is a pain, though. First, a disclaimer: I'm by no means an iOS developer, and have only dealt with XCode and CocoaPods a handful of times.

I first tried to make my library a pod to be installed via CocoaPods, which would allow it to have its own dependencies. However, there are two problems with installing a React Native library as a pod:

  • it has to list React as one of its dependencies, which is deprecated
  • it's incompatible with react-native link which links your iOS library for you, and would result in duplicate libraries in XCode

After this didn't work, I decided to go with the manual installation methods listed by a few other libraries (specifically react-native-lock, thanks auth0). So as it stands, after npm-installing react-native-ssh, you have to:

  • run react-native link to include the library
  • install NMSSH to your own app via CocoaPods
  • update RNSSH's Header Search Paths (react-native-ssh's name in XCode) to include your Pods headers

Perhaps I missed something, but if I haven't, this is definitely something to be addressed for React Native.

Get it while it's hot

react-native-ssh is on GitHub and npm.

A mobile app to run scripts on servers

Over the years, whether I was working with a Raspberry Pi or running a server, there would often be one-off scripts that I would want to run. The usual pattern would be:

  • SSH into the server
  • Run a single command
  • Logout

I always thought it would be nice to have a phone app that could easily run those scripts.

I'd try some mobile SSH client but those felt clunky; a full-blown terminal was overkill. I just wanted to quickly run a single script.

Other times I'd write a quick Flask app to listen on obscure ports and URLs to trigger a script. This also felt like overkill, though, because I really didn't want to have to expose some HTTP server on some port just to run a script on occasion.

So I decided to bite the bullet and write the app that I wanted.

Hooks

The app is simple. It works as follows:

  • Add a server's SSH credentials
  • You'll see a list of the executable files in ~/.hooks-app/hooks
  • Tap one of them and it will run

I myself have started to use this for a few things, including making sure all the containers are running properly on this server.

How it works

What I learned

This was the first time I used React and it's libraries. I have to say that using it, particularly together with Redux, felt elegant and safe. The fact that a global state defines the UI really makes things simpler.

Working with React Native was also a treat. Hot Loading is a wonderful feature that will update your app when you save a file, while maintaining your app's state. This makes UI work so much easier.

I also got to write some native Android code. I used the JSch Java library to do the SSH communication, so I had to write a bridge between that library and the app's JavaScript. Basically, you write a new Java class that implements method (annotated with @ReactMethod) where certain Java types map to the JS types.

Finally, I learned that ES6 is the bomb. Special shoutouts to the feature listed below.

Shorthand property names:

return { foo, bar, baz }

Object destructuring:

let { width: screenWidth } = Dimensions.get('window')

Arrow functions:

[1, 2, 3].map(x => x + 5)

Object spread operator:

{ ...currentState, ...newState }

Async / await:

let x = await somePromiseReturningMethod()

Get the app

I haven't written an iOS version of the native SSH bridge, so for now, the app only works on Android.

A simple image to backup volumes to S3

One part of setting up my online presence naturally includes getting backups going.

Since I'm trying to keep everything containerized, I did some research into what Amazon S3 backup solutions are out there. I found a popular project called dockup that basically does everything I wanted to have done.

However, upon looking at what I had to configure, I thought it could be simpler.

How dockup works

In order to get dockup working, you have to mount the volumes you want to backup to some arbitrary place in the filesystem, and provide the following environment variables:

  • AWS_ACCESS_KEY_ID
  • AWS_SECRET_ACCESS_KEY
  • AWS_DEFAULT_REGION
  • BACKUP_NAME
  • PATHS_TO_BACKUP
  • S3_BUCKET_NAME

So, in English, given a bunch of directories (specified in PATHS_TO_BACKUP), dockup will create a timestamped backup (using the name BACKUP_NAME) in the bucket S3_BUCKET_NAME.

I'd do it a bit differently

My ideal backup image would work different in a few ways.

First, I want a separate backup for each of my apps. At any given time, I'm not sure which services I will be running. Maybe I'll stop the blog and keep the git repo running. Or maybe I'll add a new service. I want to keep the data for each of those services separate.

Next, I shouldn't have to specify which directories I want to backup. I could just put my volumes somewhere specific, like /backups.

Finally, the structure of the backup directory can contain the bucket and name. For example, any data in the directory /backups/app-backups/blog-data will be bundled and named blog-data and placed in the app-backups bucket.

So I made my own

With those ideas in mind, I made my own image called s3-backup. The following block is now live in my Docker Compose file:

  backups:
    image: ptrvldz/s3-backup:0.1
    container_name: backups
    restart: always
    volumes:
      - ghost:/backups/ptrvldz-backups/ghost-blog
      - gogs:/backups/ptrvldz-backups/gogs
    environment:
      - AWS_SECRET_ACCESS_KEY=$AWS_SECRET_ACCESS_KEY
      - AWS_ACCESS_KEY_ID=$AWS_ACCESS_KEY_ID
      - AWS_DEFAULT_REGION=$AWS_DEFAULT_REGION

All I have to do is provide my AWS credentials and put my volumes in the right places. With this setup, the two following backups are placed in my ptrvldz-backups bucket:

  • ghost-blog/ghost-blog-TIMESTAMP.tar.bz2
  • gogs/gogs-TIMESTAMP.tar.bz2

You can find s3-backup on GitHub and Docker Hub.

Anatomy of this site's Docker Compose file

As it stands, this server has two services running: a blog and git repository. They're both routed to by an nginx proxy, and my free SSL certificates are provided by the oh-so-wonderful Let's Encrypt.

The best part is that all of that is defined in and deployed by using a single Docker Compose file.

That means the only thing I had to do on my server was install Docker (which is made easy by Docker Machine). The rest happens inside containers that play well with each other thanks to Docker Compose.

I'm going to explain the file section by section, but first, here's all of it:

version: '2'

services:

  nginx-proxy:
    image: jwilder/nginx-proxy:0.4.0
    container_name: nginx-proxy
    ports:
      - "80:80"
      - "443:443"
    volumes:
      - certs:/etc/nginx/certs:ro
      - /etc/nginx/conf.d
      - /etc/nginx/vhost.d
      - /usr/share/nginx/html
      - /var/run/docker.sock:/tmp/docker.sock:ro
    environment:
      - DEFAULT_HOST=ptrvldz.me

  letsencrypt-nginx-proxy:
    image: jrcs/letsencrypt-nginx-proxy-companion
    container_name: letsencrypt-nginx-proxy
    volumes_from:
      - nginx-proxy
    volumes:
      - /var/run/docker.sock:/var/run/docker.sock:ro
      - certs:/etc/nginx/certs:rw

  blog:
    image: ghost:0.11.2
    container_name: blog
    volumes:
      - ghost:/var/lib/ghost
    environment:
      - VIRTUAL_HOST=ptrvldz.me
      - LETSENCRYPT_HOST=ptrvldz.me
      - [email protected]

  git:
    image: gogs/gogs:0.9.97
    container_name: git
    volumes:
      - gogs:/data
    environment:
      - VIRTUAL_HOST=git.ptrvldz.me
      - VIRTUAL_PORT=3000
      - LETSENCRYPT_HOST=git.ptrvldz.me
      - [email protected]

volumes:

  ghost:
    external: false
  gogs:
    external: false
  certs:
    external: false

Version

The first line defines which Docker Compose file format we're going to write. The recommended format is the newer format, so we start the file with:

version: 2

Services

Next we get to the meat of the file, where we define our services. We begin our service definitions with the line:

 services:

And away we go.

Service: nginx proxy

The nginx-proxy image is one of the most magical of them all.

Let's consider a usual desired setup: you want to host various web apps on different subdomains on a single server. The way we typically solve this is by running a web server that forwards requests to the desired applications.

There is usually a bunch of boilerplate involved in getting this going, but in essence, you're just mapping a domain to some local port where your app is running.

The nginx-proxy image removes the boilerplate. Once running, it finds any containers that have the VIRTUAL_HOST environment variable, and then forwards any requests bound for the domain defined by the variable to that container.

In other words, if we start a WordPress container with the environment variable VIRTUAL_HOST set to wordpress.somesite.com, then the nginx proxy will forward all requests for wordpress.somesite.com to that WordPress container.

So let's look at the definition of the nginx-proxy:

  nginx-proxy:
    image: jwilder/nginx-proxy:0.4.0
    container_name: nginx-proxy
    ports:
      - "80:80"
      - "443:443"
    volumes:
      - /var/run/docker.sock:/tmp/docker.sock:ro
      - certs:/etc/nginx/certs:ro
      - /etc/nginx/conf.d
      - /etc/nginx/vhost.d
      - /usr/share/nginx/html
    environment:
      - DEFAULT_HOST=ptrvldz.me

The first line is the name of our service. We then define which image we want to use and what we want to call the container when it's running.

Because this is a web server that will be SSL-enabled, we specify that we want our actual "hardware" server's port 80 and 443 to be forwarded to our nginx proxy.

We then define our various volumes. First, we give the container access to our host Docker socket because that's how it will gather data about other containers. We then use a named volume (identifiable by the slash-less string before the colon) for the SSL certificates because that's where our letsencrypt container will place them. And then the remaining three volumes are defined so that our letsencrypt container can write to the files in there.

Finally, we define the environment variable DEFAULT_HOST so the proxy knows which domain is default, in case a request does not ask for a specific domain.

Service: SSL certificate generation

If you've not yet heard of it, Let's Encrypt is a great project that allows you to get free SSL certificates. With the easy-to-use clients that exist, it's all pretty much automatic.

And if you're using nginx-proxy, it's even easier. All we give our letsencrypt container is:

  • access to our nginx-proxy volumes
  • the Docker socket so it can see which services need a certificate
  • a place to put the certificates

Let's look at the service definition:

  letsencrypt-nginx-proxy:
    image: jrcs/letsencrypt-nginx-proxy-companion
    container_name: letsencrypt-nginx-proxy
    volumes_from:
      - nginx-proxy
    volumes:
      - /var/run/docker.sock:/var/run/docker.sock:ro
      - certs:/etc/nginx/certs:rw

The first three lines again define the name of the Docker Compose service, the image we're using, and the name of the running container.

We then specify that we want it to have access to the volumes that we created for our nginx-proxy.

And finally, we give it access to the Docker socket and tell it to use a named volume for the certs. Note that the named volume here (certs) is the same as the named volume being accessed by the nginx-proxy.

Service: Blog

We finally get to an actual application, a blog.

I knew I didn't want to use something heavy like Wordpress. And I love static-site generators, but I have to spend some time thinking about a setup.

So I went with a compromise: Ghost. I can self-host it, and posts are written in Markdown, so I can port to some static-site generation setup with ease later.

So now that all our preparation was done in the previous service definitions, let's see how we can define our Ghost blog:

  blog:
    image: ghost:0.11.2
    container_name: blog
    volumes:
      - ghost:/var/lib/ghost
    environment:
      - VIRTUAL_HOST=ptrvldz.me
      - LETSENCRYPT_HOST=ptrvldz.me
      - [email protected]

Again, the first three lines are the Docker Compose service name, the image that we'll be using, and container name.

We then define a named volume for our data because we want our blog data to exist even if we recreate this container.

And now the magic.

  • By setting VIRTUAL_HOST to ptrvldz.me, our nginx-proxy will know to forward requests for ptrvldz.me to this container.
  • By setting LETSENCRYPT_HOST and LETSENCRYPT_EMAIL, our letsencrypt container will use that data to create SSL certificates for this service.

Service: Git repository

And so our final service, the Git repository. I went with Gogs. I originally liked Gogs because of it's portability, thanks to it being a single binary. Considering I'm running it inside a container, that doesn't matter as much, but oh well.

Let's take a look at the service definition:

  git:
    image: gogs/gogs:0.9.97
    container_name: git
    volumes:
      - gogs:/data
    environment:
      - VIRTUAL_HOST=git.ptrvldz.me
      - VIRTUAL_PORT=3000
      - LETSENCRYPT_HOST=git.ptrvldz.me
      - [email protected]

It's all the same as the blog, but there is one difference: VIRTUAL_PORT.

If a container only exposes a single port, then our nginx-proxy is smart enough to know it should forward requests to that port. However, if several ports are exposed by a container, you can specify which one is correct by setting VIRTUAL_PORT to the correct one.

Volumes

The last section of the file is the volumes block. If you use named volumes, you must define them in this section, and so we do:

volumes:

  ghost:
    external: false
  gogs:
    external: false
  certs:
    external: false

Setting external to false for our volumes will tell Docker Compose that it should create them if they're not there.

And we're done

So to reiterate, we have nginx forwarding requests to two applications, each with valid SSL certificates. With each distinct service in its own container. All this accomplished with 57 lines of configuration in a single file.

And what if we wanted to add one more service, like that WordPress instance we mentioned earlier? Probably about 10 more lines and we'd have it routed to by nginx and secured with its own certificate.

I thank the powers that be for containers.

Back online

It's been a while since I've had any form of personal site.

Every time I wanted to start one, I would overthink it.

I'd think about the various apps I wanted to host, like a blog, a git repository, a file server, maybe even my own mail. And it'd be all nicely organized and deployable.

But in the end, all I'd do was think and not do.

So today, simple beginnings: